Egg-cellent Egg Experiments: Rubber Egg

Rubber Eggs

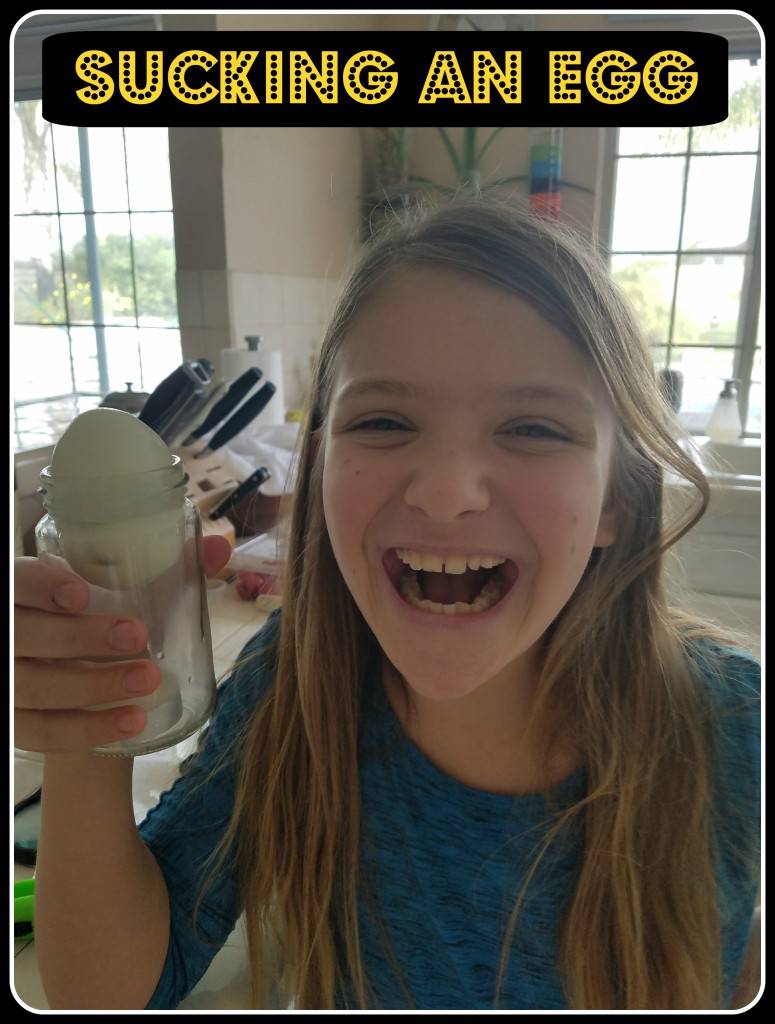
Is it getting close to that time of the year when you are feeling a little ‘hoppy.’ It’s that egg coloring, basket making time of the year. Do your kids love to color the hard boiled eggs, but don’t like to eat them? So what do YOU do with all of the extra hard boiled eggs that you have around the house after Easter? Well at our house we get itchy to do some science!

Egg Experiments

Materials you will need:
1-2 hard boiled eggs
1 glass jar that is tall enough to contain your eggs while they are submerged in vinegar
White vinegar (enough to cover your eggs in the jar)

What you should do:

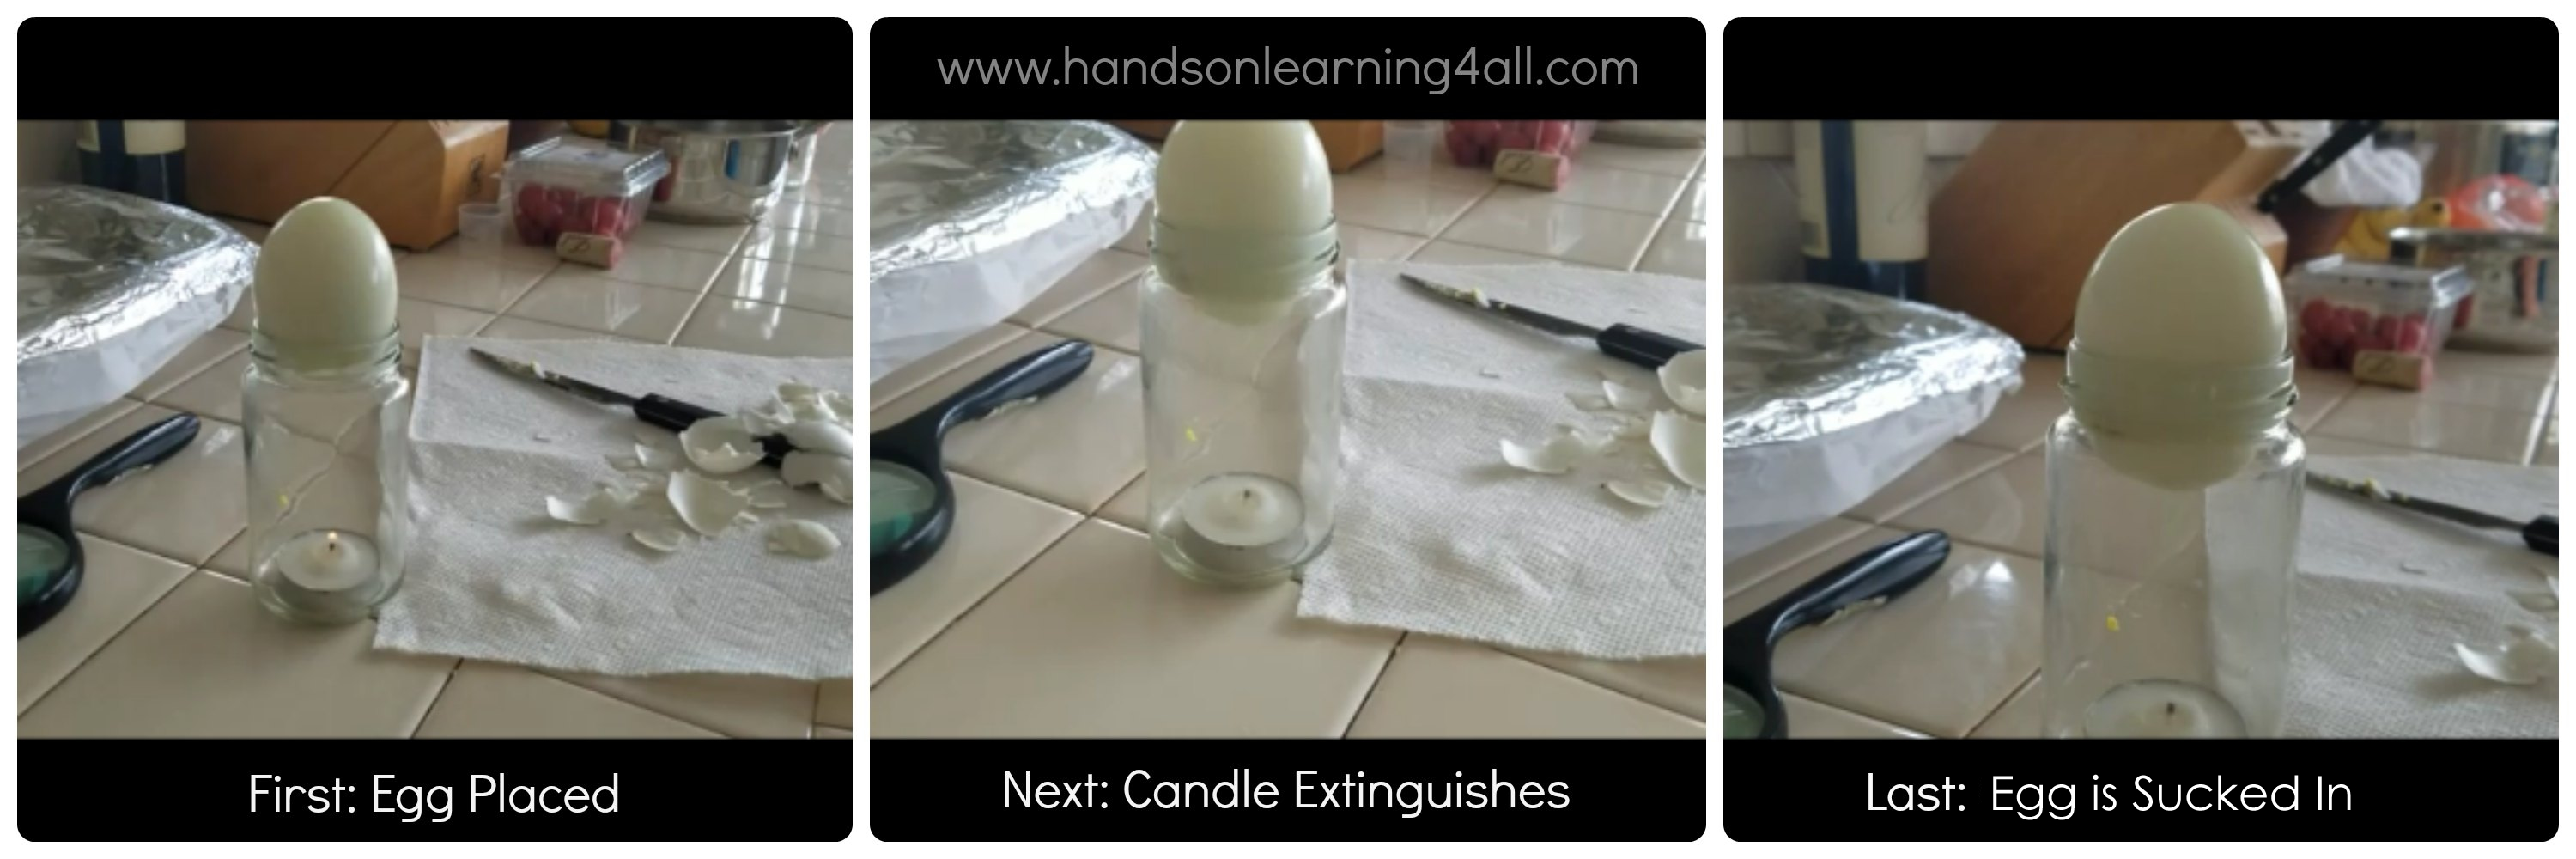
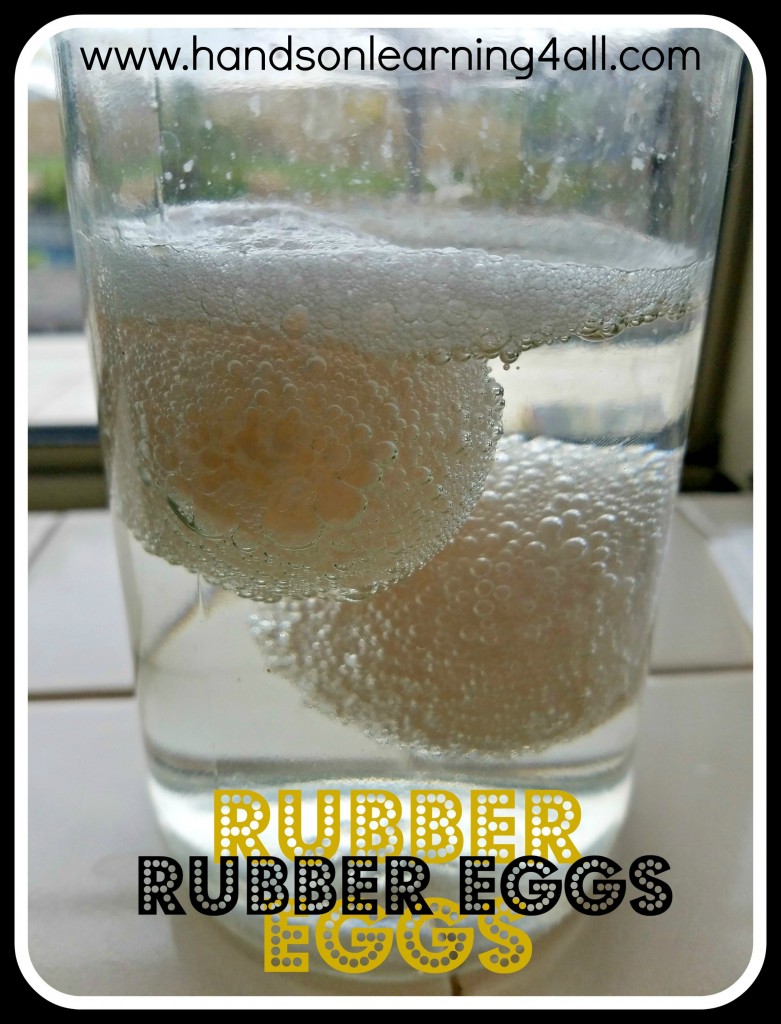
Carefully put your eggs into your glass jar and then pour the vinegar over them until they are covered. You may have to poke them with a spoon every few hours to submerge them back into the vinegar.

What is happening:

Almost immediately you will observe tiny bubbles form all over your eggs. The eggshell is made of calcium and carbonate. The vinegar which is acetic acid starts to break down the shell. The bubbles that you see are the carbon dioxide that is formed when the vinegar breaks down the shell into its basic parts, calcium and carbonate, the carbonate forms carbon dioxide bubbles on the eggs.

What can I do next:

If you wait 24 hours and carefully pull one egg out and put it onto a plate you will see that the shell has been completely dissolved and only the membrane is left to hold the egg together. If you cut the membrane with a knife the egg will ‘pop’ and you will see the liquid white and yolk inside the egg.

Wait about six days to pull out the second egg (you will want to switch out the vinegar once or twice during this time and store your jar in the fridge. At this time your egg will get a bit bigger and the inside of your egg will become more fluid and white. Why? Once the shell is gone, the vinegar will cross over the semi-permeable membrane through a process called “osmosis” and begin to ‘cook’ or pickle the inside while slightly inflating the egg. This egg will bounce, but do it carefully….one little puncture and it will explode into a watery mess.

Want MORE Egg-cellent Egg Experiments? Click through for another great egg-sperience!

Other resources for EGG-cellent learning:

Iowa Egg Council Activity Pages
School Tube: Magic School Bus – Cracks a Yolk
Scholastic’s Activity for Magic School Bus- Cracks a Yolk

Egg-cellent Egg Experiments: Sucking an Egg

sucking an egg

Yes, we are going to suck and egg–> inside of a bottle! If you have been reading our other Egg-cellent Egg posts — Rubber Egg and Egg Drop of Doom — you have seen that hard boiled eggs are a great science tools.

This egg-speriment involves air pressure and heat. When air is heated it expands rapidly, this is the reason a hot air balloon rises. When air is cooled it takes up less space, the reason why the lid of a hot jar gets sucked in a bit when the jar cools on the counter. We are going to use this concept to suck an egg into a bottle.

What you need:

1 Hard boiled egg
1 bottle (We used an old olive jar, but Starbucks frappuchino bottles work too. The mouth needs to be just a bit smaller than the diameter of the hard boiled egg.)
Matches or a candle flame lighter
Vegetable oil (if desired to make the opening of the jar more slick– we did not do this.)
1 tea light candle or strips of paper (we used the tea light candle.)

What you do:

First you peel your hard boiled egg. If you are using oil, now is the time to oil the mouth of the jar. We didn’t do this step. Next you carefully place the tea light at the bottom of your jar. (If you are burning strips of paper instead, you will light the paper and carefully drop the burning paper inside of the jar ***Warning: Fire burns, if you are a child ask a parent to help.*** Finally, quickly place your egg on the mouth of your jar and observe the egg getting sucked into the jar.

What is Happening:

When the candle is lit it causes the air in the jar to warm up and expand. When you place the egg on the mouth of the jar it creates a seal that prevents the expanding air inside the jar from escaping. The flame needs oxygen to burn and once the oxygen inside the jar is depleted the flame extinguishes. The air inside the jar begins to cool and contract creating a vacuum inside the jar. The egg gets sucked into the jar by the vacuum.

Here’s a video that I found on YouTube done by Home Science Tools.

I hope you have as much fun doing these Egg-cellent Egg Experiments as we did. Let me know what you discovered in the comments!

Multiplication Triads: How I taught my daughter multiplication

Anyone out there remember School House Rock? Well, I used the SchoolHouse Rock videos found on YouTube in combination with my new booklet, Multiplication Triads (affiliate link) and flash cards to teach my daughter multiplication facts. By using these three different strategies my daughter was able to memorize the multiplication facts to twelve in under two weeks. You can too.

Multiplication Triads

We got started by playing the Multiplication Triads game for the number one. Each number (1-12) has two pages in the booklet. The first page covers a number multiplied by 1 through 6 and the second page covers that same number multiplied by 7 through 12. On day one we did all of the multiplication facts for the number one. Then we wrote a flash card for each multiplication sentence (1×1=1 through 1×12=12.)

Multiplication Triads

The next day we reviewed facts for number one by playing the Multiplication Triads game again and reviewing the flash cards we made the previous day. Then we practiced the next number in the Multiplication Triads game (in this case, the number two) and completed the lesson by writing out flash cards for number two. We worked in this way through the entire Multiplication Triads booklet for twelve school days.

Multiplication Triads

We were able to integrate the SchoolHouse Rock videos when we did numbers three through twelve. (SchoolHouse Rock has no video for one or two, but they do have videos for zero and three through twelve. We found “Figure 8” one of the most helpful videos.)

By this time you may be wondering what is the Multiplication Triads game all about. Multiplication Triads associates the three numbers that work together to make up a fact family for each multiplication fact. There is a triangular work mat that is used to organized cards or dice that represent the numbers in the multiplication fact the student is trying to memorize. Each number has a set of two work pages that work through the multiplication facts 1-12 for that number. The student fills in the triads on the work pages to memorize the numbers associated with each multiplication fact’s family of numbers.

Multiplication Triads

Here’s what people are saying about my Multiplication Triads booklet:

  • Kate D. from Teacher Pay Teachers.com said: “I LOVE this product and I am SURE my kiddos will too!”
  • Maps and Charts and Webs OH MY (A Teachers Pay Teachers Seller) said: “Great resource!”
  • Jennifer Marlowe (A Teachers Pay Teachers Seller) said: “Love this resource.”

Here’s what the booklet includes:

This 40 page booklet is the perfect tool to teach your students multiplication fact families from x1 through x12.

The booklet includes:
– 24 work pages to play the game
– a work mat page
– a page with a template for a ‘make-your-own’ 12 sided die*
– 6 pages of number cards that can be cut out or reprinted for multiple students*
– a teacher’s guide

Work pages can also be used independently of the game for extra practice or homework.

*The die template and printable cards are included so you can choose how students play the game.

The game can be played with individual students, small groups of students, or an entire class.

*hard plastic dice are not included.

You can find your copy to purchase in two convenient ways.

Multiplication Triads Multiplication Triads
Amazon.com Soft cover(affiliate link) Teachers Pay Teachers (digital download)

Did you know that by using different strategies to learn facts (reading, playing a game, listening to music, watching a video) you are engaging more parts of your brain in the learning experience? Using different parts of your brain to learn a skill makes it easier to memorize the information and recall the information later. By employing the three strategies above (Multiplication Triads, SchoolHouse Rock and Flash cards) you are increasing your child’s ability to memorize multiplication facts and reducing the amount of time that it takes to do so.

I can’t wait to hear about your experiences with teaching your children multiplication. Comment below! 🙂

Make Your Own Kite

Make your own kite

There is something about kite making that is whimsical and fantastic. Ever since the first time we watched Mary Poppins together we have LOVED flying kites on a windy day. This year my daughter wanted to make her own kite just like the one in Mary Poppins. So we looked up a few ways to do it and got crafting.

518bsZvX-6L._SY300_

Step 1: We did not have a thin dowel rod, so we glued and taped a few Chinese Take-out chop sticks together.

Step 2: My daughter painted a design on a large sheet of craft paper and then we cut it into the traditional diamond shape.

Step 3: We lined up our chop sticks to extend through the center of our kite to the points and then looped string around all of the four sides.(We used butchers string for use in the kitchen but any sturdy string will do.) We folded the sides of the kite paper over the string and carefully glued and taped down the edges.

IMG_20140205_100854

IMG_20140205_100936

IMG_20140205_101217

IMG_20140205_101401

Step 4: We pulled the string that is resting on the tip of each chop stick tight and tied off the bottom of the string to complete the frame around the kite.

IMG_20140205_101953

Step 5: We taped the string to the chop sticks at each corner to secure them together and make a sturdy frame.

IMG_20140205_102433

Step 6: We tied a small loop of string on the center chop stick. This string serves as the attachment point for our long kite string.

IMG_20140205_102701

Step 7: We tied on a very long piece of fabric as the tail to the bottom of the kite. (We used an old sheet that we cut into strips. We started off with a 6′ kite tail but the kite spun in the air, so we added another strip of fabric and ended up using a 12′ kite tail to steady the flight of our kite.)

IMG_20140205_102827

I hope that you will sing “Let’s Go Fly a Kite” with your kiddos while you fly your homemade kites!

Elephant Toothpaste: A Science Experiment to demonstrate an exothermic reaction!

Elephant Toothpaste

Elephant Toothpaste has been floating around the internet long enough for the Mythbusters to take notice and do a segment on it. (http://www.youtube.com/watch?v=FvGJ3LZbhDA&list=PL0A5590CEE7F2EC3B&index=3 Skip ahead to 1:55)

So what is this stuff? Is it really toothpaste for elephants? No…but this experiment does have a VERY cool reaction and can be used to demonstrate an exothermic reaction. Here’s the definition for an exothermic reaction: An exothermic reaction is a chemical reaction that releases energy in the form of light or heat. This experiment emits HEAT! Make sure that you exercise safety when pouring the peroxide into the bottle and with the chemical results while the experiment is occurring. After the chemicals have reacted completely the foam is just water, soap and oxygen so it is safe to touch and clean up by rinsing down the drain. YOU DEFINITELY DON’T WANT TO EAT THE FOAM! (Just in case you get any ideas of using the foam as real toothpaste….DON’T!)

Elephant Toothpaste2

Here’s the ingredient list:
•1 clean 16 ounce plastic/glass bottle
•1 clean pint sized water bottle (the smallest one you can find)
•1 tray
•1/2 cup 40-volume Hydrogen Peroxide Liquid (40-volume is a 12.12% solution, ask an adult to get this from a beauty supply store or hair salon)
•1 One Packet of Dry Yeast (about 1 1/4 tablespoons)
•3 Tablespoons of Warm Water
•1 Tablespoon of Liquid Dish Washing Soap
•10 drops of Food Coloring (your choice of color)
•Small cup
•Plastic Gloves
•Safety Goggles/Glasses

What to do:
***Place the bottle onto the tray–>this will help you clean up once your ‘elephant toothpaste’ has erupted!***
1. In the small cup mix the warm water with the yeast packet and set it aside for 30 second to 1 min.
2. Have an adult put on the gloves and the safety goggles. Measure and pour the hydrogen peroxide into the bottle. (Remember the bottle should be on the tray.)
3. Add the food coloring to the bottle.
4. Add the dish soap to the bottle and gently agitate the bottle to combine your ingredients.
5. Finally pour in the yeast/water solution. Do this quickly because your reaction will occur as a result of this step.

Take notes! The foam will begin to rise inside the bottle. You will begin to feel heat coming from the foam once it begins to flow from the bottle. The heat is a result of your chemical reaction and it is called an exothermic reaction.

Now formulate a hypothesis: What will happen if you use the smaller bottle for the same experiment. Try it. What happened? Were you right? Why or why not? Take pictures and write about your experiment!

My kids LOVED this experiment. If you can’t get the salon hydrogen peroxide, regular grocery store peroxide (for minor cuts, etc.) will work…your reaction just won’t be as powerful. This is a wonderful opportunity to get your reluctant writers to write about what would happen if you changed the amounts of the ingredients or used a larger bottle instead of a smaller one. The possibilities are almost endless.

Learning Centers at HOME! Wall Boggle!

ziplock bag boggle

At home learning can be tough for homeschooling or traditional schooling families alike. You want your kids to be engaged in educational games and activities but you don’t want it to feel like ‘school’. This post is the first in a series of educational learning centers that you can set up at home that will keep your kiddos learning but it will feel like fun!

Got duct tape? Got ziplock bags? Then you have all the materials you need to make this giant wall boggle game. Just start with a line of four ziplock bags and tape them together with small strips of tape to keep them together and spaced properly. Next you tape them together with one long strip of tape ==> only tape one side, you will need to open the ziplock bags to slip in your printed letters. Do the next row the same way and so on until you have four rows of ziplock bags. Tape your rows together and you have a GIANT Boggle board. Now print off the giant letters here. Cut them out and slip them into the pockets!

This is a fun game to hang in your family room or in your child’s room to play as a relaxing activity before bedtime as you snuggle together. Anywhere you hang it, it is sure to be a favorite game for everyone to play==> even the adults!

Spring Break Activity: Easy, No Mess Paper Mache

My children have always been fascinated with making toys. They have tried making things out of cardboard, yarn, wire, wood. Some of the best items they have produced are made by using a simple ‘fake’ paper mache’ technique.

Here’s How it is Done:

  1. First crumble some paper up into the shape you desire. Use a little masking tape to hold it in place. (We like to use newspaper.)
  2. Cover the entire piece with masking tape. Smooth the masking tape out as much as possible. The piece must be covered in tape with no newspaper showing.
  3. Paint your sculpture with tempera paints and decorate it with other craft accessories like rocks, feathers, eyes, ribbons, etc.

    Here’s a sample of an environment my daughter made for dinosaurs!

    Easy, No Mess Paper Mache' Dinosaur Environment!

    Easy, No Mess Paper Mache’ Dinosaur Environment!

    I LOVE Fabri-tac for these types of projects

    Fabri-tac is a type of glue that works just like hot glue (instantly) without the heat! So it is GREAT for kid projects like this one where there may be heavy pieces to glue down. White glue can’t handle the weight of some things and the wait time is painful for children. Fabri-tac works almost instantly and really handles heavy, crazy shaped objects just as well as hot glue!

    Good Luck! I would love to see your Easy, No Mess Paper Mache’ projects! Email pictures of them to me here Veronica/Hands On Learning 4 All!

Another Spring Break Activity: Build a Rube Goldberg Machine

Building a Rube Goldberg Machine

Building a Rube Goldberg Machine

This is the marble run we own.

What is a Rube Goldberg Machine? Take a look at this classic video.

How to start:

Get a bunch of building materials together. Tinker toys, pool noodles, marble tracks, books, tape (masking and clear), wooden blocks, legos….you get the idea. Now watch the videos above and below and let your imagination start working. Start with a track of some kind and a ball. Most Rube Goldberg machines have a ball that runs on a track that triggers other elements to move along the path to get to the end.

Here’s another example from a commercial for Sharp’s Touch Wood Phone:

Here’s an idea for how to use a pool noodle as a track

Image courtesy of: http://pinterest.com/pin/343258802818836114/

Image courtesy of: http://pinterest.com/pin/343258802818836114/

A Little bit about Rube Goldberg

Excerpted from: http://www.rubegoldberg.com/about
“Rube Goldberg (1883-1970) was a Pulitzer Prize winning cartoonist, sculptor and author.
Reuben Lucius Goldberg (Rube Goldberg) was born in San Francisco on July 4, 1883. After graduating from the University of California Berkeley with a degree in engineering, Rube went on to work as an engineer for the City of San Francisco Water and Sewers Department.

After six months Rube shifted gears and left the Sewers Department to become an office boy in the sports department of a San Francisco newspaper. While there he began to submit drawings and cartoons to the editor until he was finally published. Rube soon moved from San Francisco to New York to work for the Evening Mail drawing daily cartoons. This led to syndication and a national presence – and the rest is history.

A founding member of the National Cartoonist Society, a political cartoonist and a Pulitzer Prize winner, Rube was a beloved national figure as well as an often-quoted radio and television personality during his sixty year professional career.

Best known for his “inventions”, Rube’s early years as an engineer informed his most acclaimed work. A Rube Goldberg contraption – an elaborate set of arms, wheels, gears, handles, cups and rods, put in motion by balls, canary cages, pails, boots, bathtubs, paddles and live animals – takes a simple task and makes it extraordinarily complicated. He had solutions for How To Get The Cotton Out Of An Aspirin Bottle, imagined a Self-Operating Napkin, and created a Simple Alarm Clock – to name just a few of his hilariously depicted drawings. ”

I hope this gives you some great ideas to make your own Rube Goldberg Machine. I would love to see your inventions. You can send your videos of your Rube Goldberg Machine to Veronica/Hands On Learning 4 All

Milk Carton and Toilet Roll Tube Terrarium

Milk Carton Terrarium

Milk Carton Terrarium


Step 1:
Cut the plastic gallon container just below the handle.
Step 2:
Fill the bottom of the container with soil about 1″ high.
Step 3:
Label the toilet roll tubes with the seeds that they will contain.
Step 4:
Push the toilet roll tubes into the soil to help them stand tall.
Step 5:
Fill the tubes with soil (don’t have to be to neat here the overflow will just fill the base of the container a bit more.)
Step 6:
Plant your seeds into their corresponding tubes.
Step 7:
Water gently. Place the top half of the carton back on top of the bottom half to create the ‘dome’ of your terrarium. Leave the lid off if the seeds remain too moist or screw it on to maintain more moisture.

Watch the seeds grow. We started ours 2 weeks ago and they are doing very well. Some are ready to be planted into larger containers. I would love to hear about how your kiddos do with their seed terrariums!

Closed Terrarium

Closed Terrarium

Homemade Bottle Stomp Rocket!!!!!!

I host a book club on a monthly basis for a group of homeschooling kids ages 4-13. We read one book each month from the Magic Tree House book series by Mary Pope Osborne. This month’s discussion will be about the Midnight on the Moon book from the series. I usually plan a discussion of the book and a craft or activity based on the book’s theme. This month our craft/activity will be launching stomp rockets.

Here is how to make the ‘launch’ pad and the rocket for the activity if you want to build one on your own.

Materials Needed

You will need: 1 Standard 2 liter bottle with a hole drilled in the middle of the cap, 3' of flexible foam tubing, 1 1/2" diameter PVC tubing- 1 ft., 1" PVC straight adapter to a threaded end (the threaded end will hold the lid of your 2 ltr bottle- take one along to the store to make sure it fits tightly), Paper towel tube with one end sealed with masking tape, Duct tape, Fabric Tac glue or hot glue

Foam to Adapter

Use the fabri tac glue to attach the smooth end of the PVC adaptor to the flexible foam tubing. Apply glue to the end of the adapter then slide it into the foam tubing.

Duct tape Adapter to foam tubing

Duct tape Adapter to foam tubing.

Fit PVC tube into foam tubing

Fit PVC tube into the opposite end of the foam tubing by cutting a small slit in the foam tubing.

Duct tape foam to PVC

Duct tape foam to PVC and thoroughly cover the slit making a tight fit with no air leaks.

Glue bottle cap in threaded end of adapter

Glue bottle cap in threaded end of adapter. I used the 2 liter bottle as leverage to screw the cap into the adapter. I placed the fabri tac glue inside the adapter on/into the threads. Then I removed the bottle to make sure that the bottle didn't get glued to the lid just in case the glue leaked inside.

Slide the paper tube rocket over the PVC tube and stomp to launch

Once all of your glue has dried screw on the empty 2 liter bottle. To make the rocket: Tape one end of your paper towel tube with masking tape and decorate it as you like. Slide the open end of the paper tube rocket over the PVC tube and stomp to launch!